rss
twitter
    Find out what I'm doing, Follow Me :)

Friday, May 28, 2010

CSS In Magento

The first thing that you need to do with Magento is famililarise yourself with the CSS files, as you will be using these an awful lot. There are 7 different files in total, so you need to know what is located where and the things you will need to edit.

Most of the editing is done in the "boxes.css" file. All of the css files are located in ".../skin/frontend/YOUR_THEME/YOUR_THEME/css". If you have not changed the name of the theme or created a new one then it will be called "default" (".../skin/frontend/default/default/css") If you wish to change the colours or settings of any forms, tables, menus, buttons, error messages; then this is the place to be.

Ten Tips for Keeping your Magento Store Secure

Are you worried about the security of your Magento store? Magento has a number of built-in security features aimed at keeping you safe, but there are some steps you can take to make your site even more secure. Follow this ten-point security policy to protect your site from hackers and security breaches.

1. Choose a secure password

When you're choosing your Magento site's administrator passwords, choose wisely. Depending on your configuration and permissions, this password may give access to customer information and credit card data. This is probably review for most readers, but here are some guidelines for creating a really secure password:

Bigger is better. Use at least 10 characters.
Mix upper and lower case, punctuation, and numbers.
Making your password phonetic can make it easier to remember and type quickly.

2. Require HTTPS/SSL for all pages with logins

Each time you send data over an unencrypted connection you run a risk of this data being intercepted by an unwanted third-party. Login credentials are no exception. To minimize the risk of your username and password landing in unscrupulous hands, always send it over a secure connection. By always sending your login information over an encrypted connection, hackers are limited to expensive and extremely difficult brute-force attacks.

How to require HTTPS/SLL in Magento
In Magento you can require secure logins by selecting "yes" for both "Use Secure URLs in Frontend" and "Use Secure URLs in Admin" by going to the "Secure" section of the "Web" tab in the system configuration. In order to access the system configuration, go to the "System" menu and select "Configuration."

Magento Web Configuration Screenshot
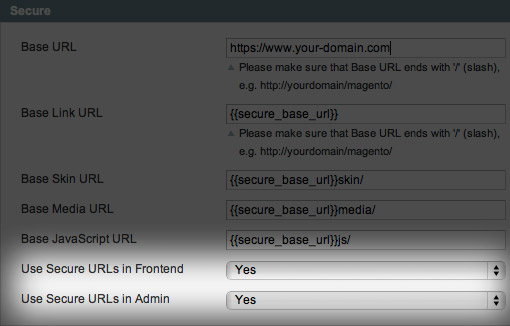
Set "Use Secure URLs" to "yes" for both the frontend and admin

3. Don't use your Magento password for anything else

Do not use your Magento password with any other web services (such as email) or any other sites (such as Twitter, Facebook, Flickr, etc.). Third-party sites may not require or even support HTTPS/SSL to login, breaking rule number two. In the event that a third-party website is hacked, your password may be vulnerable.

4. Use a custom admin path

By default, you access your Magento admin panel by going to your-site.com/admin. Having the path to your admin panel path easily guessable means that someone or something (i.e. a password-guessing robot) can snoop around and try to guess your password. By having your admin path be a secret code word instead of the default /admin, you can prevent users from guessing your password or using it if they do somehow get a hold of your password.

How NOT to change your Magento admin path
Tucked in the "admin" section of the system configuration, the "Admin Base URL" setting looks like it offers the ability to set a custom admin URL and choose whether to use that custom URL or not. But BEWARE: this setting will break Magento by preventing you from accessing the admin panel (I've tested this and found this to be true as of Magento 1.4.0.1 and earlier).

Magento Web Configuration Screenshot

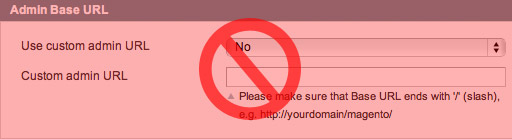
BEWARE: Do not use the admin base URL settings; it will break your site.

How to change your Magento admin path
Although the setting does not work, there is an easy way to change your Magento admin path.

Locate /app/etc/local.xml
Find <![CDATA[admin]]> and replace 'admin' with the path you would like to use

So if your local.xml file says <![CDATA[drawbridge]]>, your admin path will be /drawbridge.

5. Close email loopholes

Magento has a really convenient feature that allows administrators to reset their password if forgotten. In order to reset your password, you need to know the email account associated with the account. Then you need access to that email account to retrieve the new password. First, choose an email address that is not publicly known. Second, make sure the password for your email account is secure. Third, make sure that if your email account has a security question that allows you to reset your password, you choose a question and answer that is so obscure that it would be impossible to guess.

6. Use secure FTP

Guessing or intercepting FTP passwords is probably one of the number one ways sites get "hacked." In order to prevent unauthorized access to your sites FTP, use secure passwords and use SFTP (SSH File Transfer Protocol) or FTP-SSL (Explicit AUTH TLS). With SFTP, you can use Public Key Authentication to increase security even more by requiring a private key file and an optional de-encryption password to authenticate the FTP access.

7. Limit unsecured FTP access

If you do have to connect through regular (non-secure) FTP for some accounts (i.e. to upload photos), limit access for these accounts to a narrow set of directories. You can then use .htaccess and httpd.conf files to prevent scripts from running in these directories that can change other files and directories on the server that should not not be accessible through that FTP account.

If you have access to the httpd.conf file on your server, this is the best method to preventing scripts from running in a specific directory. Place this code in your httpd.conf file:

<directory path-to-directory-you-want-to-restrict="">
AddHandler cgi-script .php .pl .py .jsp .asp .htm .shtml .sh .cgi
Options -ExecCGI
</directory>

If you don't have access to httpd.conf, you'll have to use.htaccess. Include the following code in the .htaccess file of the directory you want to restrict:

AddHandler cgi-script .php .pl .py .jsp .asp .htm .shtml .sh .cgi
Options -ExecCGI

Because .htaccess does not support the tags, the .htaccess file must be placed in the directory you want to effect. Because of this, you need to set the permissions of the .htaccess file to 444 (read-only) to prevent modifications to the .htaccess file. You may also want to chown the file so the permissions cannot be changed. This method isn't fool-proof, but it's a good start to preventing naughty scripts from wreaking havoc.
 

Important: placing this code in a directory's .htaccess file will prevent scripts from running in that directory and all sub-directories.

8. Don't save passwords on your computer
 

Most modern computers and browsers offer the option to save passwords as a convenience so you don't have to enter your password every time. This is great most of the time, but can be a security problem because often saved passwords can be easily revealed in plain text. Anybody with access to the computer has access to the sensitive data. Even worse, someone could steal the computer and then use the saved passwords to access the sensitive data. To avoid unintended access to your Magento password or data, simply set your computer or browser to never save it— this might be a bit inconvenient, but it's a great security policy.

9. Keep up-to-date anti-virus software
 

Computer viruses and trojans can steal your data and log your key strokes. To minimize the risk of this happening, be sure to invest in reputable anti-virus software. Free anti-virus software like AVG may be great for home and personal use, but if you want indemnification or a warranty, you may want to look at commercial anti-virus software.

10. Restrict admin access to only approved IP addresses
 

You can use .htaccess to limit access to your admin area. In the .htaccess file for your admin directory, place the following code in order to block access to all IP addresses except those specifically listed:

AuthName "Protected Area"
AuthType Basic
order deny,allow
deny from all
allow from 11.111.111.11
allow from 22.2
</limit>


"allow from 11.111.111.11" blocks the specific IP address 11.111.111.11
"allow from 22.2" blocks a range of IP addresses beginning with 22.2

There is a downside to restricting access based on IP: if you travel a lot you may find this method very inconvenient as you'd have to manually add each new IP address or IP range to the .htaccess file in order to gain access.

Friday, May 21, 2010

How to remove index.php from Magento URLs

Hi, if you are using Magento and your store urls are looking this way,
http://www.soamjena.com/index.php/flavoured-condoms/moods-for-men.html

So, you must be looking , how to remove that index.php from the middle, as thats not good for Search Engine Indexing at all. So, here is the trick.

1. Goto your site root folder and you can find the .htaccess file. Just edit that. Open it on a text editor and find this line,  #Rewrite Base /magento/ . Just replace it with Rewrite Base / .

2. Then goto your Admin Panel and enable the Web Server Rewrites. You can find it at System > Configuration > Web > Search Engine Optimization.

3. Then goto your Cache Management page ( System > Cache Management) and refresh your Cache and also refresh the Web Redirects.
Thats all. Test at Frontend now..

Thursday, May 20, 2010

Magento-Moving Upselling products from content to right column

A simple solution to display upselling products in right column rather than at content part by default. Follow this steps. 

step 1:

go to catalog.xml

Hide this block as

<!–<block type=”catalog/product_list_upsell” name=”product.info.upsell” as=”upsell_products” template=”catalog/product/list/upsell.phtml”>
<action method=”setColumnCount”><columns>4</columns></action>
<action method=”setItemLimit”><type>upsell</type><limit>4</limit></action>
</block>–>

step 2:

Add the following code

<block type=”catalog/product_list_upsell” name=”product.info.upsell” before=”-” template=”catalog/product/list/upsellright.phtml” />

after this code

<block type=”catalog/product_list_related” name=”catalog.product.related” before=”-” template=”catalog/product/list/related.phtml”/>

step 3:

go to catalog/product/view.phtml

then remove the following line or commend it
<?php echo $this->getChildHtml(‘upsell_products’) ?>
like this <?php //echo $this->getChildHtml(‘upsell_products’) ?>

step 4:

create upsellright.phtml in catalog/product/list folder
and paste the following code fully

<?php if(count($this->getItemCollection()->getItems())): ?>
<div class=”box base-mini mini-related-items”>
<div class=”head”>
<h4><?php echo $this->__(‘Upselling Products’) ?></h4>
</div>
<div class=”content”>

<ol>
<?php foreach($this->getItems() as $_item): ?>
<li<?php if($_item->isComposite() || !$_item->isSaleable()): ?> class=”super-products”<?php endif; ?>>
<div class=”product-images”>
<a href=”<?php echo $_item->getProductUrl()?>” style=”margin-left:0px;”><img src=”<?php echo $this->helper(‘catalog/image’)->init($_item, ‘thumbnail’)->resize(50) ?>” alt=”<?php echo $this->htmlEscape($_item->getName()) ?>” width=”50″ height=”50″ /></a>
</div>
<div class=”product-details” style=”margin-left:70px;”>
<a href=”<?php echo $_item->getProductUrl() ?>”><?php echo $this->htmlEscape($_item->getName()) ?></a>
<?php echo $this->getPriceHtml($_item, true) ?>
<?php if ($this->helper(‘wishlist’)->isAllow()) : ?>
<a href=”<?php echo $this->getAddToWishlistUrl($_item) ?>” class=”link-cart”><?php echo $this->__(‘Add to Wishlist’) ?></a>
<?php endif; ?>
</div>
</li>
<?php endforeach ?>
</ol>
</div>
</div>
<?php endif ?>

Wednesday, May 19, 2010

Analysis & Usage of Collections in Magento

As a Magento Programmer I am fascinated by the use & simplicity of collection used in Magento. Simplicity, does not really mean being simple (it is rather complex structured) but easy to use. With the help of one of my colleague, I got down to understand how collection really represents the “collection” of data we are actually trying to get from database. Here is what I found drilling down into the Magento’s Core. I may be “not quite right” with the analysis, you can always comment.

Almost all the collections found inside app/code/codepool/Namespace/Module/Model/Mysql4/model/Collection.php are the child of parent Class Mage_Core_Model_Mysql4_Collection_Abstract. Primary thing done in the class constructor is initializing its resource and Model. If you look into one of the Collection class you can see in its constructor.

/**
    * @class Mage_Checkout_Model_Mysql4_Agreement_Collection
    * Initialize resource
    *
    */
    protected function _construct()
    {
      $this->_init('checkout/agreement');
    }

And this _init function has been implemented in its parent class as

/**
         * Standard resource collection initalization
         *
         * @param string $model
         * @return Mage_Core_Model_Mysql4_Collection_Abstract
         */
        protected function _init($model, $resourceModel=null)
        {
            $this->setModel($model);
            if (is_null($resourceModel)) {
                $resourceModel = $model;
            }
            $this->setResourceModel($resourceModel);
            return $this;
        }

The resource class can be found in app/code/codepool/Namespace/Module/Model/Mysql4/model.php. And this resource class in turn initializes the database table to be used in the Module along with the table’s primary key.

class Mage_Checkout_Model_Mysql4_Agreement extends Mage_Core_Model_Mysql4_Abstract
        {
     
        protected function _construct()
        {
            $this->_init('checkout/agreement', 'agreement_id');
        }
        ......
        }

It is this resource class that actually works out the database connections, read/write adapters and performs transactions. So this is the basic deduction about the link of collection with the database and its tables. But how are those collection formed still remains a mystery, not anymore! In this section of the post I will try to explain how are the collections really formed.

If I can, “collection” can be defined as collection or array of its resource. And in Magento case, most of the resources are database’s query results. Simply you can visualize “collection” to be array of your model’s resource. If a “query” in Magento returns a collection of all the products then it would mean that the very collection is an array of all the individual product’s object. But one question still remains how will the database query’s result transform into a Magento “collection“. To understand that we need to understand the collection class and its parents.

The class Structure for Mage_Core_Model_Mysql4_Collection_Abstract is like this.

Mage_Core_Model_Mysql4_Collection_Abstract
|__ Varien_Data_Collection_Db (C)
|__ Varien_Data_Collection (C)
|__ IteratorAggregate (I)
|__ Countable (I)

You can see that all collection implements two Interfaces IteratorAggregate & Countable.

IteratorAggregate is predefined in Standard PHP Library that extends Abstract Base Class Traversable. On using this Interface you can then Iterate Through Object using “foreach” construct. Countable returns the size of the Collection Object.

Among the two Interfaces, IteratorAggregate is particularly important. As you can see in Class Hierarchy both the interfaces are implemented by Varien_Data_Collection concrete class. IteratorAggregate has abstract public method getIterator() which returns the Iterator interface and the concrete Class has to implement the method on its own. It is this Iterator that provides the real iteration functionality.

So if you look into the Varien_Data_Collection you will find the getIterator() implemented like this.

/**
         * @class Varien_Data_Collection
         * Implementation of IteratorAggregate::getIterator()
         */
        public function getIterator()
        {
            $this->load();
            return new ArrayIterator($this->_items);
        }

As you can see that it first loads the “items” (I will get back to this Items) and instanciates the value to an internal Class ArrayIterator. And the Iterator returned by this function can then be iterated using foreach construct.

Looks like it is going to be a looonnnnng post, let be summarize what I’ve tried to point out until now. I’ve tried to show the link between the collection class or rather object with the database table and explain the iteration behavior of the collection object. But one question still remains how will the database query’s result transform into a Magento’s “collection“. This is where the “items” explanation need to be done.

“Items” are actually array if individual object (item) of the collection which represents the array of tuple of the database query result. As you see in the snippet above the ArrayIterator takes $this->_items are parameter. But $this->_items are not populated here on Varien_Data_Collection but rather on is child class Varien_Data_Collection_Db. Here’s the snippet from Varien_Data_Collection_Db.

/**
         * Load data
         * @class Varien_Data_Collection_Db
         * @return  Varien_Data_Collection_Db
         */
        public function load($printQuery = false, $logQuery = false)
        {
            if ($this->isLoaded()) {
                return $this;
            }
   
            $this->_renderFilters()
                 ->_renderOrders()
                 ->_renderLimit();
   
            $this->printLogQuery($printQuery, $logQuery);
   
            // Getting Data from DB
            $data = $this->getData();
   
            $this->resetData();
   
            if (is_array($data)) {
   
                // Looping on each result row
                foreach ($data as $row) {
                    // Creating Empty "item" Varien_Object's object
                    $item = $this->getNewEmptyItem();
   
                    if ($this->getIdFieldName()) {
                        $item->setIdFieldName($this->getIdFieldName());
                    }
   
                    // Setting Varien_Object's values to that of the row
                    $item->addData($row);
   
                    /**
                    * Adding the "item" to the collection @class Varien_Data_Collection
                    * So while referring to $this->_items @class Varien_Data_Collection it will return array of this "item"
                    */
                    $this->addItem($item);
                }
   
            }
   
            $this->_setIsLoaded();
            $this->_afterLoad();
            return $this;
        }
   
        /**
         * Get all data array for collection
         * @class Varien_Data_Collection_Db
         * @return array
         */
        public function getData()
        {
            if ($this->_data === null) {
                $this->_renderFilters()
                     ->_renderOrders()
                     ->_renderLimit();
   
                // Fetching all the row with the Select query set
                $this->_data = $this->_fetchAll($this->_select);
                $this->_afterLoadData();
            }
            return $this->_data;
        }

You can go through the inline comments I’ve added. This is it, I’ve finally worked out the explanation of structure & creation of Magento’s Collection and its iterative behavior. I’ve tried to show pictorially (below) what I have just described. Confused! Plz comment and of course please do comment if I am wrong, because there are “times” when you try to understand things even though they actually aren’t just like you think. I’d like to quote Paulo :“I see the world in terms of what I would like to see happen, not what actually does”!


Tuesday, May 18, 2010

How To Setup Conversion Tracking In Magento

3rd Party Conversion Tracking

Magento Commerce has the ability to track eCommerce sale with Google Analytics out of the box (more on that in a future post). Something that a lot of merchants struggle with is how to set up conversion tracking for other tracking software or comparison shopping engines.

How To

Here is an easy hack to track conversions for Shopzilla, PriceGrabber and the likes:

Open the file: app\design\frontend\XXXX\XXXX\template\checkout\success.phtml

At the end of the file, add the following code, this will create two variables with the order number and the order total:

1    <?php
2        //Get Order Number & Order Total
3        $order = Mage::getModel('sales/order')->loadByIncrementId(Mage::getSingleton('checkout/session')->getLastRealOrderId());
4        $amount = number_format($order->getGrandTotal(),2);
5    ?>

After the above code snippet, copy and paste the tracking code from the third party analytics software of comparison shopping engine. Insert the following variable where they suggest placing the order ID and the order total:

1    <?php echo $amount; ?> // Order Total
2    <?php echo $this->getOrderId() ?> // Order Number

Here is a code example for the Shopzilla conversion tracking tool:

1    <script language="javascript">
2        var mid            = 'XXXXX'; // Your Shopzilla Merchant ID
3        var cust_type      = '';
4        var order_value    = '<?php echo $amount; ?>'; // Order Amount
5        var order_id       = '<?php echo $this->getOrderId() ?>'; //Order Number
6        var units_ordered  = '';
7    </script>
8    <script language="javascript" src="https://www.shopzilla.com/css/roi_tracker.js"></script>
9    <script language="JavaScript" src="https://eval.bizrate.com/js/pos_193511.js" type="text/javascript"></script>

Monday, May 17, 2010

How to Add Video to Products in Magento

Adding a video to a product greatly enhances the online shopping experience. The out-of-the-box Magento package doesn’t support video. This How-To shows just how to do that. We’ll be able to either (1) drop in HTML embed code from sites like YouTube, or (2) use an FLV file that we provide.

This article assumes you have the jQuery Javascript library installed and have “jQuery.noConflict()”‘ set up.  If you don’t have jQuery.noConflict(), then simply replace instances of “jQuery” with “$”.  If you don’t have this library, download jQuery here.

Here’s the sequence of steps we’re going to take:
  1. Create a product attribute for the video code
  2. Assign the newly created attribute to an attribute set
  3. Modify the template files
  4. Obtain and upload a copy of the free JWPlayer
  5. Add video to a product using HTML embed code or using an FLV file
1. Create a product attribute for the video code.

Log in to your Magento Admin Panel. Navigate to Catalog > Attributes > Manage Attributes. Click on the “Add New Attribute” button found close to the top-right hand corner of the screen. The first tab that’s open is the *Properties* tab. You are presented with lots of textboxes and dropdowns. Here’s what to fill them in with :


Attribute Properties

- Attribute Code: video
- Scope: Global
- Catalog Input Type of Store Owner: Text Area
- Default Value: [leave blank]
- Unique Value: No
- Values Required: No
- Input Validation for Store Owner: None
- Apply To: All Product Types

Frontend Properties

- Use in quick search: No
- Use in advanced search: No
- Comparable on Front-end: No
- Use in Layered Navigation: No
- Use in Search Results Layered Navigation: No
- Use for Price Rule Conditions: No
- Position: 0
- Allow HTML-tags on Front-end: Yes
- Visible on Product View Page on Front-end: No
- Used in product listing: No
- Used for sorting in product listing: No

Then navigate to the *Manage Label / Options* tab. You only have to fill in the “Admin” value, and for this use “Video“. This can be changed later if you need to.

Click the “Save Attribute” button to save the attribute.

2. Assign the newly created attribute to an attribute set (likely Default)
While still in the Admin Panel, navigate to Catalog > Attributes > Manage Attribute Sets. From the right-hand column, labeled “Unassigned Attributes”, drag our new video attribute to the “General” group found in the middle column.

Click “Save Attribute Set” button to save the attribute set.

3. Modify the template files
You’ll need to use a text-editor and FTP client.

3a. video.phtml
Create a file with these contents:
<?php
$_product = $this->getProduct();
?>
<?php if( $video = $_product->getVideo() ){ ?>
<h2>Product Video</h2>
<div class="products">
<?php if( file_exists( getcwd() .'/skin/frontend/[your-package]/[your-theme]/videos/'. $video ) ){ ?>
<div id="mediaspace">&nbsp;</div>
<script>
jQuery( document ).ready( function(){
jQuery.getScript( '<?php echo $this->getSkinUrl('videos/mediaplayer/swfobject.js'); ?>', function(){
var so = new SWFObject('/skin/frontend/[your-package]/[your-theme]/videos/mediaplayer/player.swf','ply','470','320','9','#ffffff');
so.addParam('allowfullscreen','true');
so.addParam('allowscriptaccess','always');
so.addParam('wmode','opaque');
so.addVariable('file','<?php echo Mage::getBaseUrl(); ?>/skin/frontend/[your-package]/[your-theme]/videos/<?php echo $video; ?>');
so.write('mediaspace');
} );
} );
</script>
<?php } else { ?>
<?php echo $video; ?>
<?php } ?>
</div>
<?php } ?>
And save the file as /app/design/frontend/[your-package]/[your-theme]/template/catalog/product/view/video.phtml

3b. catalog.xml

Open up /app/design/frontend/[your-package]/[your-theme]/layout/catalog.xml and add this line:
<block type="catalog/product_view" name="product_video" as="product_video" template="catalog/product/view/video.phtml"/>
as a child anywhere inside this node:
<block type="catalog/product_view" name="product.info" template="catalog/product/view.phtml">

… and save the file.

3c. catalog/product/view.phtml

Open up /app/design/frontend/[your-package]/[your-theme]/catalog/product/view.phtml and add this line:
<?php echo $this->getChildHtml('product_video'); ?> 
wherever you want the video to appear on the page.  Save the file.

4. Obtain and upload a copy of the free JWPlayer

Download the player
After you download the ZIP file, extract and upload the files using an FTP client to: /skin/frontend/[your-package]/[your-theme]/videos/*
With the FTP client, rename the “mediaplayer-viral” folder to “mediaplayer”

5. Add video to a product

In the Magento Admin Panel, navigate to Catalog > Manage Products and click on the product you’d like to add video to. You should see a textarea labeled “Video”.

5a. Use HTML embed code

In the “Video” textarea, simply drop in the HTML code you’ve received (such as from YouTube) and click “Save” to save the product.

5b. OR use an FLV file

- Upload your FLV file to /skin/frontend/[your-package]/[your-theme]/videos/

- In the “Video” textarea, specify the filename of the FLV you’ve just uploaded.

Repeat Step 5 for all of the products you want to add video to. 

Congratulations, you’ve added video to your products.

* This method is tested and working for Magento v 1.3.2.4

Friday, May 14, 2010

Magento Admin Grid: how to change number of rows

We had a request from our client, that we change default number of items in Magento admin grid. Now, this is very simple, when we know how to change it. Below you can see an example which uses magento observer model and event hocking “core_block_abstract_prepare_layout_before”.

Magento Admin Grid: how to change number of rows

First of all, make backup copies of your files.

Step 1.
This is example of event hocking, put it in config.xml

01.<adminhtml>
02. <events>
03. <core_block_abstract_prepare_layout_before>
04. <observers>
05. <reward>
06. <class>grid/observer</class>
07. <method>applyLimitToGrid</method>
08. </reward>
09. </observers>
10. </core_block_abstract_prepare_layout_before>
11.
12. </events>
13. </adminhtml>

Step 2.
Create model class observer.php

01.class Inchoo_Grid_Model_Observer
02.{
03.
04. public function applyLimitToGrid(Varien_Event_Observer $observer)
05. {
06. $block = $observer->getEvent()->getBlock();
07. if(($block instanceof Mage_Adminhtml_Block_Widget_Grid) &amp;amp;amp;amp;amp;amp;amp;amp;amp;amp;amp;amp;amp;&amp;amp;amp;amp;amp;amp;amp;amp;amp;amp;amp;amp;amp; !($block instanceof Mage_Adminhtml_Block_Dashboard_Grid))
08. $block->setDefaultLimit(200);
09.
10. }
11.
12.}

It would be good that you make your own module and all put in it. I hope that you know how to make magento module.

Thursday, May 13, 2010

Magento Layout / Structural Block How to?

1. Layout your Structural Blocks

When you begin the implementation process, first ask yourself this question: What are the layout needs of my store?

What this simply means is: “Will my store always have a left column? Or will some pages have a left, main and a right column? Or perhaps some of the pages will just one column?”. These questions are imperative because the variations of page structure will directly determine the number of skeleton templates you will need to create – For instance, if you have a one column and a 3 column layout, you will need to create two skeleton template accordingly. But before we go further, let’s first look at what a skeleton template looks like.

<div class="header">getChildHtml('header')?&gt;</div>
<div class="middle">
<div class="col-left">getChildHtml('left')?&gt;</div>
<div class="col-main">getChildHtml('content')?&gt;</div>
</div>
<div class="footer">getChildHtml('footer')?&gt;</div>

Pretty straight forward. This type of templates are what we call “skeleton templates” because it exists for the purpose of positioning structural blocks within a page. Such templates are located in app/design/frontend/default/default/template/page/, and you can name it anything you want – mycolumns.phtml, 2columns-left.phtml, whatever suits your fancy. “Wait a minute!!! What is all this getChildHtml(”)?> business?” you say. Ok, let’s move along.

If you examine the method getChildHtml(’header’)?>, you will see that there’s an identifier called “header” being assigned to the area encased by the XHTML
. What getChildHtml does, is it grabs all the content blocks(see step 2 below) that is assigned to “header” via something called a layout (see step 3 below), and places it inside
2. Distribute your Content Blocks (aka Let’s cut up some real meat of the page)
Content blocks are the ones that actually parse your store’s data into visually appealing format using XHTML. Unlike other eCommerce solutions you may be used to, Magento supplies separate content blocks per separate functionalities. What this means is, your col_left.tpl (or whatever else you may be used to working with), no longer contains ALL the XHTML to be shown in the left column but rather, the functionality used in the left column will recruit its own template for use. Let’s take the demo Magento as an example. If you open a category page on your browser, you will see in the right column the following functionalities: mini-cart, compare products, newsletter and community poll. Each of these content blocks comes with its own template file. Because mini-cart is a separate functionality, as is the compare products, newsletter…etc, mini-cart has it’s own template file, compare products has its own template file, and newsletter has its own template file. The XHTMLyou create should be cut up accordingly on per functionality basis.

3. Let’s recap and comprehend
In this step, let’s take a breather and do a quick recap.
When working in the visual aspect of a store running on Magento, there’re three things you will use to visually parse your store data.

Structural Blocks
Structural blocks are the visual skeleton of a store page. These blocks exist for the sole reason of creating visual structure. Example structural blocks are header, left column, main column, footer…etc.

Content Blocks
Content blocks are the blocks that constructs the makeup of a structural block. Each content block represents distinct functionalities such as Mini-cart, mini-wishlist, compare products, newsletter signup…etc, and they comes with it’s own template.

Layouts
Located in app/design/frontend/your_package/your_theme/layout, layout is the one that puts all the pieces together. When a page loads in your store, the following things happen:
a. The layout first grabs the base skeleton template of the site.
b. It grabs all the content blocks that are assigned to the structural blocks of a page, and loads them.
Basically the layout says “Grab these content blocks and nest them inside these structural blocks.” The layout can be updated on a per page basis, so you can conveniently change the functionalities being loaded into each page of you store with just one file.

This is the absolute quick idea of how the templates work in Magento. We’re working on a full documentation and it will be released with the stable version of Magento. In the mean time, the best thing to do is read through the threads of the forum, stay active in the community and ask a lot of questions! I hope this reply gave you some understanding of how things work in Magento.

Wednesday, May 12, 2010

Quick script to batch create Magento categories

A site we administer with a reasonable amount of SKUs (far in excess of 100,000), needed some quick category manipulation for a series of new data to be dropped in. The new information had a desired category tree that had to be built up quick, but with over 600 categories to be created, human effort wouldn’t be suitable.

So, using the Magento category ID export script to help manipulate the CSV – we were able to quickly make a script to batch create our categories.

First off, create your CSV with 2 columns, the parent ID for the category and the category name – you could easily add more columns for extra options, but it wasn’t necessary for us.

The CSV file should be something like this:

3,subcat
4,subcat2
6,subcat3

Then it should be saved in ./var/import/importCats.csv

Then save the following in ./quickCatCreate.php

<?php
 
    define('MAGENTO', realpath(dirname(__FILE__)));
    require_once MAGENTO . '/app/Mage.php';
 
    umask(0);
    Mage::app()->setCurrentStore(Mage_Core_Model_App::ADMIN_STORE_ID);
        $count = 0;
 
    $file = fopen('./var/import/importCats.csv', 'r');
    while (($line = fgetcsv($file)) !== FALSE) { $count++;
      //$line is an array of the csv elements
 
      if (!empty($line[0]) && !empty($line[1])) {
 
          $data['general']['path'] = $line[0];
          $data['general']['name'] = $line[1];
          $data['general']['meta_title'] = "";
          $data['general']['meta_description'] = "";
          $data['general']['is_active'] = "";
          $data['general']['url_key'] = "";
          $data['general']['display_mode'] = "PRODUCTS";
          $data['general']['is_anchor'] = 0;
 
          $data['category']['parent'] = $line[0]; // 3 top level
          $storeId = 0;
 
          createCategory($data,$storeId);
          sleep(0.5);
          unset($data);
        }
 
    } 
 
 
  function createCategory($data,$storeId) {
 
      echo "Starting {$data['general']['name']} [{$data['category']['parent']}] ...";
 
      $category = Mage::getModel('catalog/category');
      $category->setStoreId($storeId);
 
      # Fix must be applied to run script
      #http://www.magentocommerce.com/boards/appserv/main.php/viewreply/157328/
     
          if (is_array($data)) {
              $category->addData($data['general']);
 
              if (!$category->getId()) {
 
                  $parentId = $data['category']['parent'];
                  if (!$parentId) {
                      if ($storeId) {
                          $parentId = Mage::app()->getStore($storeId)->getRootCategoryId();
                      }
                      else {
                          $parentId = Mage_Catalog_Model_Category::TREE_ROOT_ID;
                      }
                  }
                  $parentCategory = Mage::getModel('catalog/category')->load($parentId);
                  $category->setPath($parentCategory->getPath());
 
              }
 
                    /**
                     * Check "Use Default Value" checkboxes values
                     */
                    if ($useDefaults = $data['use_default']) {
                        foreach ($useDefaults as $attributeCode) {
                            $category->setData($attributeCode, null);
                        }
                    }             
 
              $category->setAttributeSetId($category->getDefaultAttributeSetId());
 
              if (isset($data['category_products']) &&
                  !$category->getProductsReadonly()) {
                  $products = array();
                  parse_str($data['category_products'], $products);
                  $category->setPostedProducts($products);
              }
 
              try {
                  $category->save();
                  echo "Suceeded <br /> ";
              }
              catch (Exception $e){
                      echo "Failed <br />";
 
              }
          }     
 
  }

Then it is just a matter of visiting the link in your browser to create the categories – customise to your hearts content, any further expansion should be very easy (such as product association etc.)

Uh oh – I’m getting errors after the first record!

Fatal error: Call to a member function getPath() on a non-object in app\code\core\Mage\Catalog\Model\Resource\Eav\Mysql4\Category.php on line 385

There is a small NB though, there is a bug with Magento’s original code that will cause a problem with the above script, a quick fix is outlined here. It is just a matter of commenting out 2 lines to force the variable to be re-set.

In ./app/code/core/Mage/Catalog/Model/Resource/Eav/Mysql4/Category.php line #110

protected function _getTree()
    {
        //if (!$this->_tree) {
            $this->_tree = Mage::getResourceModel('catalog/category_tree')
                ->load();
        //}
        return $this->_tree;
    }

Tuesday, May 11, 2010

Magento - Yahoo Analytics Conversion Code

Unlike other tracking codes, we need to put Yahoo Analytics Conversion code between <HEAD> and </HEAD> tags.

Yahoo’s Instructions for the following code are:

Copy the HTML code below and insert it between the <HEAD> and </HEAD> tags on your site’s conversion page(s). To pass a dynamic revenue value in the tag, you must modify your web pages accordingly.

To add the Yahoo conversion tracking code in the Head tags, we need to look at the checkout layout configuration file:
/app/design/frontend/your_interface/your_theme/layout/checkout.xml

Find out which page layout it uses when an order is completed.

i.e.) For one page checkout, look for this code:

<checkout_onepage_success>
<reference name="root">
<action method="setTemplate"><template>page/2columns-right.phtml</template></action>
</reference>

You can edit the Head section of ‘2columns-right.phtml’ to add the Yahoo tracking code. But if this template, 2columns-right.phtml is being used for other pages, I would make a copy of it and name it ‘2columns-right-success.phtml’ and add the tracking code there. This way, it will track it only when there is a successful conversion.

<html xmlns="http://www.w3.org/1999/xhtml" xml:lang="<?php echo $this->getLang() ?>" lang="<?php echo $this->getLang() ?>">
<head>
<?php echo $this->getChildHtml('head') ?><SCRIPT language=”JavaScript” type=”text/javascript”>
<!– Yahoo! Inc.
window.ysm_customData = new Object();
window.ysm_customData.conversion = “transId=,currency=,amount=”;
var ysm_accountid = “—–YAHOO_ACCOUNT_ID—–”;
document.write(”<SCR” + “IPT language=’JavaScript’ type=’text/javascript’ ”
+ “SRC=//” + “srv2.wa.marketingsolutions.yahoo.com” + “/script/ScriptServlet” + “?aid=” + ysm_accountid
+ “></SCR” + “IPT>”);
// –>
</SCRIPT>

Tuesday, May 4, 2010

How to Import Products into Magento

There’s a little confusion among some on how to import products into a Magento ecommerce store. I spent some time today researching and trying to find the best method on doing this. The reason for my research is because there was no simple documentation anywhere that I could find on how to import products. Magento actually has built a pretty robust import/export mechanism into the ecommerce cms that has a ton of flexibility to do many things. I’m not going to cover all of those. This is just for those of you who simply just want to import products into their Magento cart.

Step 1 – Add a new product manually
add a new product manually to the catalog, assign it to a category, and fill out all fields that will be necessary to your store. The obvious ones are price, description, quantity etc. It’s important that you fill out all fields that you know you are going to need for all the products you import.

Step 2 – Export Your Products
Now we want to export your product to a .csv file so that we can view the fields that are required to import. Go to System >> Import/Export >> Profiles. Now click on Export All Products then Run Profile. Click on the “Run Profile in Popup” button. Once the export is completed, go to your var/export directory on your Magento install and you will find the .csv file there for you to download.

Step 3 – Analyze The .CSV File
Now if you look at your .csv export file you will see the field names that you need to match up. Now just start filling yours in and creating your csv file ready for import. This step is extremely important. Otherwise Magento cannot match what you are trying to import and the importing will fail. At a most basic level, here are the fields that I imported:
    •    store
    •    attribute_set
    •    type
    •    sku
    •    category_ids
    •    status
    •    visibility
    •    tax_class_id
    •    weight
    •    price
    •    name
    •    description

Step 4 – Import Your New .CSV File
Now go to System >> Import/Export >> Profiles. Now click on Import All Products. Change “Type” under Data Format to CSV/Tab Seperated. Now click on Upload File, and browse for your .csv file and click “Save and Continue Editing”. Now go to “Run Profile” and select your file from the dropdown menu. Click the button underneath to run the import. And whalllah. All your products should now be imported.